Explore the transformative potential of square mirror tiles with innovative design ideas that can elevate any living space.
Square mirror tiles are an excellent choice for those looking to add a touch of modern elegance to their homes. These versatile pieces can be arranged in countless ways to create striking patterns and reflections, transforming any room into a stylish, light-filled space.
Whether you’re looking to make a statement wall, create a unique backsplash, or simply add depth to a small room, this article will provide you with a variety of design ideas to inspire your next home improvement project.
Dive in to discover all the ways you can use square mirror tiles to enhance your home’s aesthetic.
Mosaic Patterned Mirror Wall

Selecting square mirror tiles in various sizes and shades will yield the best mosaic results. The scattered layout can reflect different angles in the room, creating unique interest points.
The crucial steps in creating this mosaic mirror wall include:
- Deciding on a general pattern or freehand design.
- Laying the tiles out flat to visualize the final look before adhering them to the wall.
- Using a strong adhesive suitable for walls and mirrors.
- Leaving enough space between tiles for grout if a traditional mosaic effect is desired.
- Cleaning the mirrors effectively after grouting.
With these steps, the vibrancy of a mosaic patterned mirror wall can uplift any space with its intriguing reflections and shadows. Plus, the mixture of different tile sizes provides a dynamic yet cohesive feel.
Mirror Tiled Kitchen Backsplash

The reflective nature of square mirror tiles increases light dispersal, which can make your kitchen feel brighter and more spacious. This is a key point.
It affords an unexpected design flair that elevates the everyday kitchen aesthetic.
It is practical as much as aesthetic, and it is easy to clean and maintain.
Appropriate placement can highlight key design elements in the kitchen, such as a polished granite countertop or custom cabinetry.
There is versatility in design with possibilities for creative tile patterns, such as vertical, offset, and herringbone.
It complements various kitchen styles, be it modern, traditional, or industrial.
It can create a focal point when combined with undercabinet lighting.
Consultation with a professional tile installer is recommended for a seamless finish.
Staggered Overlap Mirror Tile Feature

To achieve an appealing staggered effect, focus on these main aspects:
- 1. Obtain various square mirror tile sizes.
- 2. Attach larger tiles first to establish the foundation.
- 3. Overlap smaller tiles over the corners of the larger ones, maintaining a regular pattern.
- 4. Use a spirit level to maintain alignment and balance during the installation.
- 5. Ensure enough adhesive for secure tile placement, adjusting pressure to avoid tile breakage.
- 6. Opt for professional installation where necessary for clean, precise work.
The staggered overlap technique introduces a dash of visual interest, creating a light-reflecting element that lends depth and dimension to your room.
Square Mirror Tile Art Piece

Showcase creativity and personal style with a DIY art piece made from mirror tiles.
1. Choose a pattern or design, such as a geometric shape or abstract arrangement.
2. Select the size and quantity of square mirror tiles needed.
3. Utilize a sturdy backing like a wooden board or canvas.
4. Attach mirror tiles using reliable adhesives.
5. Hang securely in a well-lit area to maximize reflections.
6. Use a gentle glass cleaner for maintenance.
7. Achieve different effects by choosing between clear, tinted, or antique finishes.
Framed Mirror Tile Headboard

A framed mirror tile headboard is a stunning interior design choice that adds a touch of sparkle and shine to any bedroom. Use a mixture of different sized square mirror tiles to create a unique, eye-catching pattern.
Frame this with painted wood or metal to accentuate the mirror and to match it with the rest of the room’s decor.
Key Points:
- Choose square mirror tiles of various sizes for textural interest.
- Use a painted wood or metal frame that complements the room’s overall aesthetic.
- Carefully plan the layout of the tiles within the frame, creating a pattern or random design.
- Prioritize proper installation techniques to secure the mirror tiles safely to the headboard.
- Consider integrating soft lighting fixtures around the headboard to enhance the reflective nature of the mirror tiles.
Mirror Tile Fireplace Surround

As an alternative to traditional brick or stone, mirror tiles can effectively transform your fireplace surround into a stunning focal point. The reflective nature of mirror tiles enhances the light in the room, giving your space a brighter, larger feel. Not to mention, mirror tiles are easy to clean, keeping your fireplace sparkling with minimal effort.
- 1. Explore various tile sizes and thicknesses for visual depth.
- 2. Consider silver, antique, or smoked mirror tiles based on your interior color scheme.
- 3. Always use heat-resistant adhesive suitable for mirror tiles.
- 4. Align tiles accurately, take into account that imperfections will be amplified due to mirror reflection.
- 5. Try incorporating accent tiles or creating patterns for a customized look.
- 6. Detailed planning and correct tile placement are the keys to achieve a seamless appeal.
- 7. Regular polish keeps mirror tiles gleaming and gives the fireplace an added charm like no other.
Mirror Tile Wall in Entryway

Creating a dynamic first impression. Reflecting natural or artificial light. Enhancing a sense of spaciousness.
Play with shapes for uniqueness: round table, angular console.
Complement with similar color tones: silver-framed artworks, metallic decors.
Thoughtful lighting: chandelier, table lamp, recessed lights.
Easy maintenance and cleaning.
Using different sizes for an eclectic feel.
Attention to tile spacing: zero gap or distinct grout lines.
Grid Pattern Pictorial Creation

1. Choose the wall you want to transform and measure its dimensions to determine tile quantities.
2. Opt for a consistent color palette, monochromatic or contrasting as per your preference.
3. Pencil out the desired pattern on the wall and number each square for easy mapping.
4. Attach mirror tiles strictly following the planned grid pattern.
5. Mind the gaps between each tile; they should be accurate right down to the millimeter.
6. Wipe each fitted tile for any adhesive residues that might tarnish the mirror finish.
7. Ensure that all tiles align smoothly with one another to avoid any visual hiccup.
8. Use strategically placed lighting to enhance the multidimensional pictorial effect.
9. Regular maintenance like cleaning and dusting will keep your grid pattern art immaculate.
Mirror Ceiling With Square Tiles

Shimmering and reflective, the choice of square mirror tiles for ceilings can provide a visually stunning layer of depth and brightness. Not only does it enhance overall illumination but can make a small room appear spacious.
- Strategic Placement for Maximum Reflection: Choosing where to install mirror tiles greatly influences the spatial perception in a room.
- Choosing the Right Size of Tiles: Depending on ceiling height and room dimensions, the size of the tiles can be adjusted to achieve the desired visual effect.
- Professional Installation: Given that this is a vertically elevated surface, professional intervention is recommended to ensure a secure and safe installation.
Remember, it’s crucial to clean them regularly to maintain their sheen and reflectiveness, a task made easier by choosing easy-to-clean treated mirror tiles. With their help, keep the room visually appealing and bright.
Mix and Match Color Mirror Tiles

Exploring a variety of tones, from bronze to silver and gold, can take the design flair to the next level. This technique sparks visual interest and introduces an element of surprise.
Below are some key considerations:
- Determining the color palette: Consistency is important. Choose colors that complement the room’s decor.
- Placement of tiles: Varying placements create a dynamic look. Consider placing darker shades lower and lighter ones higher for a unique gradient effect.
- Size of tiles: Using different-sized mirrors can enhance the overall design. However, remember to maintain balance.
- Reflective qualities: Different colored mirrors reflect light uniquely. Use this to your advantage to highlight specific areas in the room.
- Texture: For added depth and interest, think about incorporating textured colored mirror tiles.
Geometric Patterns With Square Mirror Tiles

Creating an abstract or regular pattern can captivate and draw eyes to specific areas of the room. Key points to keep in mind:
- Balance: Achieve visual harmony by carefully aligning and spacing your mirror tiles.
- Scale: Depending on your room size, consider the best suited geometric pattern.
- Shape combinations: Mix square tiles with other shapes to create unique designs.
- Color: Include colored mirror tiles to add dimension and depth.
- Light: Leverage the natural or artificial light in your room to enhance your design.
- Illusion: Utilize geometric patterns to create depth or widen a narrow space.
- Placement: Install your tiles on an accent wall, behind furnishings, or throughout an entire room depending on your design goal.
- Symmetry: Symmetrical patterns are pleasing to the eye and easily achieved with square tiles.
These elements, when combined correctly, can effectively transform any room into an exquisite dwelling.
3D Cube Illusion Mirror Wall

Crafted meticulously, a 3D cube illusion with mirror tiles can result in a mesmerising spatial effect, adding depth and interest to any wall.
The three key points to consider when wanting to achieve this effect can be condensed as follows:
- Proper Placement: Positioning of the tiles is crucial. Each square mirror tile must be cleverly attached in a diamond orientation, where the corners point upwards, downwards, and to each side. This results in an optical illusion of a cube.
Correct Angling: Each tile should be angled in such a way to catch light from diverse directions. The purpose is to cast shadows that make the flat surface appear three-dimensional.
Layering: Creating a few layers with more tile rows accentuates depth and adds complexity to the arrangement, elevating the effect of the illusion.
These aspects, while seemingly simple, can considerably alter your space, making it exude contemporary aesthetics.
Mirror Tile Table Top

An immediate way to inject a dash of sparkle and glam into your living space, a mirror tile table top can swiftly become an accent piece in any room.
- Suitable for both coffee tables and dining tables.
- Adds an element of space illusion due to the reflection.
- Can be complemented with a customized mirror tile edging for an extended design.
- Durability similar to glass table tops, but requires careful cleaning to avoid scratches.
- Provides an opportunity to experiment – tiles can be arranged in a grid, diamond, or herringbone pattern.
- Works well with contemporary and sleek furniture, enhancing the overall aesthetic.
- Can help to bounce light around, making the space appear brighter.
Square Mirror Tile Room Divider

Effective for creating separate spaces within any room, square mirror tile dividers serve multiple purposes while beckoning with modern sophistication. Here’s how to bring this concept to life:
1. Select the square mirror tiles of your chosen dimensions. Standard sizing ranges include two, three, four, or six inches.
2. Decide between a frameless finish for a minimalistic look, or a framed divider for a more classic feel.
3. Plan for an opaque backing material, such as MDF or Plywood. This provides a solid anchor for tile adhesive, improves stability, and allows for mobility of the divider.
4. Assess the length and width needed. This depends on the area you intend to divide and the aesthetic value you wish to present.
5. Adhere the mirror tiles, following the chosen design. Consider leaving small gaps between the tiles for an effect equivalent to windows.
6. Add discreet wheels on the base to easily maneuver between spaces.
7. Band the divider’s edges with a strip of plain trim or ornate molding for a polished finish.
Remember to ensure safety while implementing this design. Add bumpers on the corners of the panel and check for stability after installation. Square mirror tile room dividers can work remarkably well in creating separate spaces while reflecting light and creating a sense of depth, making your room appear larger than it is.
Bathroom Mirror Tile Feature Wall

Transitioning from the grid and mosaic patterns, consider utilizing square mirror tiles in the bathroom for a unique and dazzling feature wall.
Selection of the feature wall: Northern wall is preferable for natural reflections.
Size of the mirror tiles: Larger ones offer fewer lines and more continuity.
Arrangement: Aligning the tiles evenly can reflect a clean and sharp ambiance.
Grouting: Use of a clear or mirror-like variant for seamless integration.
Maintenance: Regular cleaning to maintain brightness and minimize marks.
Lighting: Pair with effective lighting for enhancing reflections.
Combination: Combine with other tiles types for distinctive look.
Safety: Ensure tiles are securely affixed to prevent accidents.
Remember, the impact of mirror tiles lies in their ability to make the space appear larger and brighter, creating a spa-like sanctuary right in your home.
Use of Different Sized Square Mirror Tiles

Diverse dimensions bring dynamism to interiors, while amplifying the refractive characteristics of square mirror tiles. Large tiles can be used as central statement pieces, while medium and small ones naturally induce effects of depth and texture.
Key Points:
- Formation of a central focal point with larger tiles
- Induction of depth and texture with medium-sized tiles
- Small tiles for high-detail accentuation and complex patterns
- Mixing sizes to create unique geometric patterns
- Incorporation of different dimensional tiles to balance large wall spaces
- Use of varying sizes to create movement and flow in the space
- Suitable for living area, entryway, or even bedroom walls
Horizon Mirror Wall Piece

Upon the pre-selected wall, focus on creating an expansive visual landscape with the tiles. Assemble the mirror tiles in a broad horizontal alignment, which gives an illusion of spreading vastness.
Key points:
- 1. The selection of wall: Pick a large, uninterrupted wall.
- 2. The layout: Extend the tiles lengthwise across the wall.
- 3. The arrangement: Align the tiles edge to edge, minimizing gaps.
- 4. Visual effect: Creates a panoramic, horizon-like illusion, adding depth to your room.
- 5. Additional benefit: Bounces off natural light, giving a brighter ambience.
This design helps specifically in opening up smaller spaces, reflecting light in darker rooms, and adding a modern style statement to your dwelling.
Herringbone Pattern Mirror Tile Wall

Creating this unique design involves following a precise arrangement. Exquisitely adhering each square mirror tile at an angle where each forms a ‘V’ shape. This pattern needs to mimic the distinct characteristic skeletal structure of the Herringbone fish hence the name – Herringbone design.
Some key considerations when crafting this design:
- 1. Accurate measurements: This design requires precision in lines and angles. An errant tile can disrupt the entire pattern. You’ll need a level and measuring tape.
- 2. Pre-planning layout: Chart your design on paper first, reflecting where each tile will be positioned.
- 3. Appropriate tiling adhesive: Utilize a robust mirror mastic or construction adhesive. A weak bond could result in tiles slipping, while a too-rough adhesive could scar the mirrors.
- 4. Matching the grout: When filling in spaces between tiles, consider the color of your grout. A contrasting color will make the pattern pop, while a matching color provides a seamless look.
- 5. Tile cutting equipment: Given the complexity of the pattern, some tiles will need to be cut for perfect alignment. A tile cutter or wet saw will help.
- 6. Safety measures: When cutting, use safety goggles to protect eyes from shards.
- 7. Patience and Care: Last, but not the least, take time to arrange and adhere each tile. Rushing may lead to misalignments or mishaps.
Mirror Tile Wainscoting

A reinterpretation of a classic decorating feature, mirror tile wainscoting adds sophistication mixed with modern flair to any room. Effective and practical, it visually enhances the space and doubles the light, creating a stunning effect.
1. Selection and Installation: Opt for square mirror tiles of similar or varying sizes that align with your design aesthetic. Securely install them at the lower half of the wall, typically at three to four feet from the floor.
2. Styling: Complement with a glossy or matte paint finish on the upper wall. A chair railing, either in wood or metallic finish, could provide a finishing touch.
3. Upkeep: Regular cleaning with a microfiber cloth and a gentle glass cleaner will maintain the mirror’s sparkling reflection.
4. Transition: Mirror tiles could be gradually interspersed with regular tiles for a smooth transition in the design, softening the overall effect.
Preparing for this project involves staying patient, precise, and creative. The end result is well worth the effort – a stunning space that invites and impresses.
Mirror Tile Inset Within Cabinetry
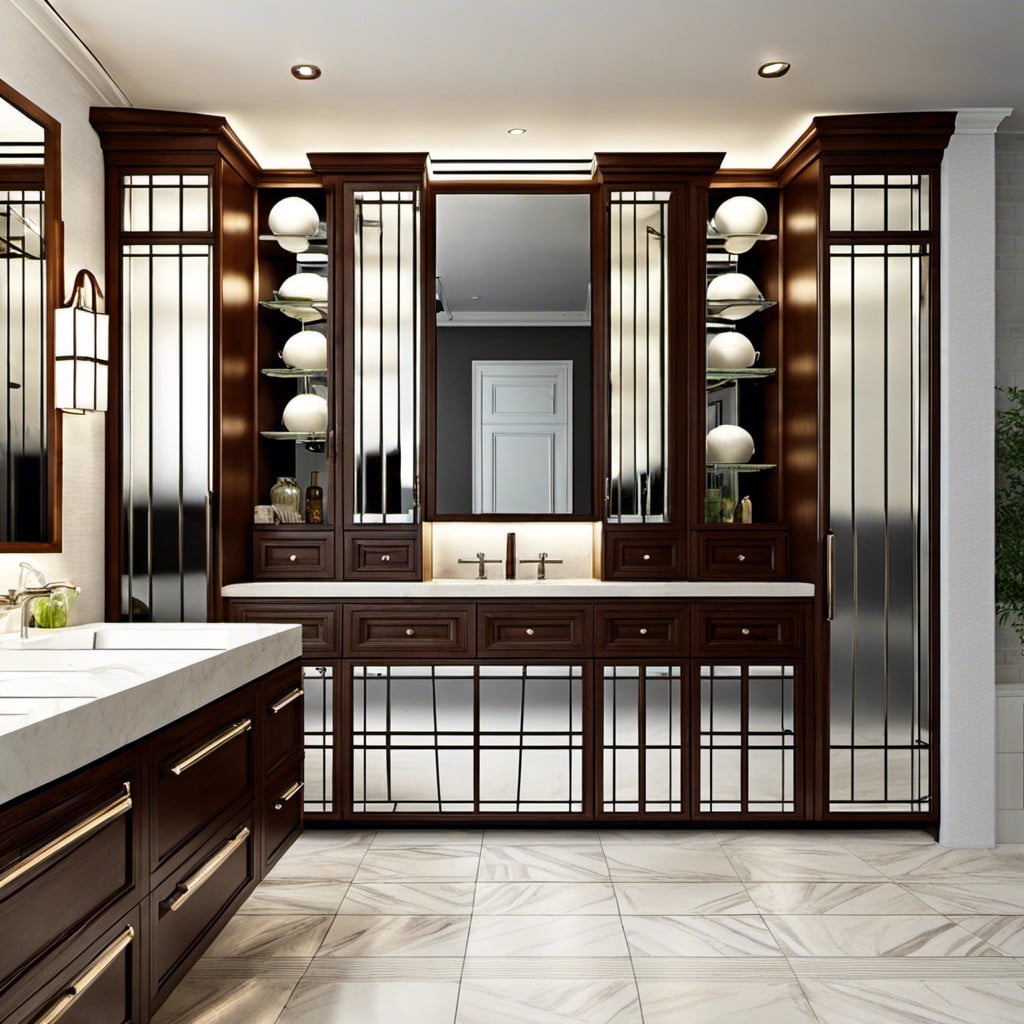
One unique avenue to explore is integrating mirror tiles within your cabinetry. This can be an especially useful concept in smaller spaces where light and depth are needed.
- Select cabinets with panel insets, offering a flat surface for tile application.
- Measure cabinet panels accurately to ensure correct tile sizing.
- Choose adhesive suitable for both the cabinet material and mirror tile.
- Lay out the tiles on the ground first to visualize the pattern and spacing before application.
- Use a clean, damp cloth to wipe away excess adhesive before it dries.
- Incorporate mirror tiles selectively, either on every cabinet or as an accent on key pieces.
- Apply tiles with care to ensure a smooth, sleek finish.
Continue exploring:


