Explore chic and functional design ideas to transform any room into a harmonious music studio.
Transforming a home into a music studio can be an exciting project. Whether you’re a professional musician or an enthusiastic amateur, having a dedicated space to create and enjoy music can greatly enhance your experience.
This article will provide a plethora of design ideas to help you create a stylish and functional music studio in your home. From soundproofing tips to equipment placement, and from lighting to decor, every aspect will be covered in detail.
So, let’s strike the right chord and dive into the world of music studio design.
Soundproofing Walls and Ceilings

The importance of a studio’s sound design shouldn’t be underestimated. To start, a dense object helps prevent sound transmission through walls and ceilings. Materials such as drywall, mass loaded vinyl, or resilient channel can prove useful.
Doors and windows can be problem areas for sound leakage. Consider investing in solid core or soundproof doors. To handle windows, there are solutions such as double-pane or soundproof glass. For ceilings, adding an extra layer of drywall with green glue or installing a drop ceiling can significantly reduce noise transfer.
Lastly, always check for gaps and cracks which may become sound leakage points and seal them with acoustic caulk or any suitable soundproofing sealant.
- Use dense materials for walls and ceilings.
- Consider solid core or soundproof doors.
- Use double-pane or soundproof glass for windows.
- Check and seal all potential noise leakage points.
Hardwood Flooring for Better Acoustics

When choosing flooring for your music studio, hardwood is the way to go. It serves multiple purposes. Not only is it durable and easy to clean, but it also enhances the sound quality. This type of flooring reflects sound rather than absorbing it, resulting in cleaner, clearer recordings.
1. Increased sound reflection: Hardwood yields a natural reverb which enhances audio output.
2. Resilience and longevity: These floors withstand heavy music equipment and high foot traffic.
3. Easy maintenance: Simple to clean and doesn’t harbor dust or allergens.
4. Aesthetically pleasing: Brings a stylish, professional look to your studio.
Remember, choose a type of wood that suits your studio’s specific acoustic needs. Oak, maple, and bamboo are popular choices. Carefully plan the layout to avoid excessive echo. Using rugs can also help manage sound reflection where needed.
Custom Storage for Equipment

Keeping your music equipment organized goes a long way in ensuring the longevity of these items and contributes to seamless studio operations. Consider cabinets with sound-absorbing interiors to reduce audio bounce. Drawers with designated compartments are also suitable for smaller items such as cables, headphones, and microphones. Customized shelves can be used to store larger instruments. Desks with integrated racks can house your audio interfaces and outboard gear while minimizing clutter.
- Cabinets with sound-absorbing interiors
- Drawers with designated compartments
- Customized shelves for larger instruments
- Desk with integrated racks for interfaces and gear
Adjustable Lighting Setup

Lighting is more critical than you might think, greatly impacting the vibe, work ethics, and even sound recordings. With adjustable lighting, you can move from soft ambient light for relaxing, to bright and direct light for more detailed work.
- Consider dimmable LED lights for overhead lighting.
- For detailed work, near-field desk lamps with adjustable brightness are the best options.
- Install movable track lighting. It allows you to change the direction of light and focus on certain areas.
- Don’t overlook natural light. Control it using adjustable blinds or curtains.
- Use light shades to filter and diffuse harsh lighting, ensuring a light atmosphere conducive to creativity.
- Remember the color temperature of the lights. A range from 3000K to 5000K is ideal for work environments.
- Combine different lighting types—ambient, task, and accent—for the best results.
High-tech Recording Equipment

Choosing updated, state-of-the-art tools is crucial in achieving high-quality sound. They serve as the heart of the entire production process, enabling the creation of rich, professional audio.
1. Digital Audio Workstations (DAWs): Software for editing, mixing, and mastering tracks. Popular ones include Ableton Live, Pro Tools, and Logic Pro.
2. Audio Interfaces: Connects microphones and other audio equipment to the computer, converting analog signals into digital. Brands like Focusrite and PreSonus offer reliable choices.
3. Microphones: A variety of types like dynamic, condenser and ribbon mics are essential, each lending a different texture to the sound. Zoom and Audio-Technica are trusted manufacturers.
4. Studio Monitors: These speakers are designed for the precise reproduction of audio during mixing and mastering. KRK and Yamaha provide robust selections.
5. MIDI Controllers: These can be keyboards or other devices that provide a more tactile control over your DAW. Akai and Novation are worth exploring.
Remember, your selection should depend on the nature of your music, space, and budget rather than simply choosing the most expensive. Research and plan before making purchases.
Comfortable Seating Area

To achieve a balance between functionality and comfort, consider these factors:
- Choose sofas and chairs that offer good back support.
- Ottomans can double as extra seating or storage.
- A mix of cushions allows for choosing comfort level.
- Furniture should be lightweight and easy to move for quick room adjustments.
- Ergonomic designs are key to long hours of practicing or recording.
- Select materials that are both durable and appealing to the touch.
- Reclining options give guests the opportunity to relax while listening to sessions.
- Consider incorporating seating that doubles as equipment storage.
- Easy access to side tables and coffee tables to hold drinks, notebooks, and other items.
This set-up encourages a space that’s not only conducive to creativity but also fosters an inviting atmosphere conducive to collaboration and relaxation.
Large Windows for Natural Light

Natural light significantly elevates any environment, and a music studio is no exception. The windows should be generous enough to allow for an optimal amount of daylight, yet also strategically placed so as not to interfere with acoustics.
1. Brightens the room, improving mood and energy levels during long recording sessions.
2. Reduces reliance on artificial lighting, making it a sustainable choice.
3. Avoid positioning windows directly behind recording equipment to prevent glare.
4. Consider double or even triple glazing to provide added soundproofing without sacrificing light.
5. Use adjustable blinds or curtains to control the intensity of incoming light.
6. Shape and framing of the window can contribute to the studio’s overall aesthetics.
Acoustic Wall Panels for Sound Quality

Choosing the right acoustic wall panels can markedly enhance sound quality in a music studio. They come in a variety of materials, but the primary purpose remains consistent: to absorb, diffuse, and manage sound waves within the room.
Here are some essential aspects to consider:
- Material: Look for panels made from polyurethane foam, fiberglass, or even recycled cotton.
- Placement: Install panels at reflection points – typically, adjacent to speakers.
- Size and Thickness: Larger, thicker panels absorb lower frequencies, making them ideal for studios with bass issues.
- Design Preference: They come in a variety of colors and styles to match with your studio’s aesthetic.
- Testing: Test your room’s acoustics after installation; ideally, the sound should be clear and free of echoes.
Vintage Decor for Inspiration

Incorporating vintage pieces into your music studio can stimulate creativity and provide a unique aesthetic appeal. Keep these pivotal considerations in mind:
1. Opt for antique instruments, such as a gramophone or a classic guitar, which also serve as conversation pieces.
2. Frame old concert posters or album covers and use them as wall art.
3. Use retro radio or record player to infuse nostalgia and also act as a functional decor piece.
4. Use a vintage microphone, it could be a centerpiece that adds authenticity to the music area.
5. Display vinyl records, vintage sheet music or old music books. They not only create a sense of history, but also a readily available library of inspiration.
Remember, each piece should echo your distinct musical preferences, acting as a visual representation of your personal journey through the world of music.
Dedicated Mixing and Mastering Zone

For this zone to function optimally, consider these factors:
- 1. The location should be quiet and away from any external noise.
- 2. Spacious enough to accommodate necessary mixing and mastering equipment.
- 3. Opt for acoustic treatment for these spaces – bass traps, diffusers, and absorbers can prove beneficial.
- 4. The seating should be comfortable and adjustable for long hours of work.
- 5. Positioning the monitors at ear level in a symmetrical triangle with the listening position and keeping a reasonable distance from the wall can drastically improve sound quality.
- 6. Proper cable management for a clean and sophisticated look.
- 7. Sufficient natural and artificial light to prevent eye strain.
By adhering to these points, one can create a conducive environment for precise mixing and mastering in a home music studio.
Pop Filter and Microphone Stand

Pop filters serve a crucial role in the reduction of vocal plosive sounds, which can distort the audio quality during recording sessions. They also offer protection to the microphones from saliva, which increases their lifespan.
Key points:
- Reduces plosive sounds.
- Protects microphone from saliva.
- Improves overall audio quality.
On the other hand, a sturdy microphone stand provides stability and allows for hands-free operation which is essential during recording. It also allows for height and angle adjustments to suit the artist’s comfort.
Key points:
- Allows for hands-free operation.
- Provides stability.
- Height and angle adjustments for comfort.
Combine these two elements, and you have an essential component for high-quality, professional audio recording.
Multifunctional Furniture for Space Saving

Designing a home music studio often calls for clever utilization of available space. As important as it is to accommodate all necessary equipment, maintaining a tidy and uncluttered studio fosters a serene atmosphere conducive to creativity.
Multifunctional furniture can supply a compact solution, enabling optimal use of limited room.
Consider these ideas:
- Keyboard stands with built-in storage drawers.
- Stools which open up to provide storage for minor accessories like guitar picks or extra strings.
- A console desk that also functions as a mixing desk.
- Shelves that double as diffusers by incorporating foam into their design.
- Modular seating options which can serve as informal recording spaces.
Remember, maintaining an accessible and orderly environment can enhance productivity and fluidity in your musical workflow.
Recording Booth With Glass Window

A glass window arrangement allows for visual communication between artists and engineers during recording sessions. It also helps to maintain a soundproof environment inside the booth.
- Use double-pane glass windows for superior soundproofing.
- Opt for an angled installation to prevent sound reflection back into the microphone.
- Choose glass with a high STC (Sound Transmission Class) rating for better sound isolation.
- Consider clear glass for better visibility or tinted glass for privacy if desired.
- Competently install window seals to avoid air gaps, enhancing soundproofing effectiveness.
Investing in a quality glass window will ensure a professional and efficient recording booth.
Monitor and Speaker Placement

Ensuring optimal sound is paramount to any music studio setup. Some considerations for achieving this include:
- Position speakers at ear level to achieve a linear frequency response, reducing distortions in perceived sound.
- Create an equilateral triangle positioning between the listener and speakers to balance out sound waves.
- Maintain a specific distance from the wall to reduce bass buildup which tends to distort sound. Generally, this distance should be at least a few feet.
- Use stands or specially designed furniture to place monitors and speakers rather than setting them directly on a desk or shelf. This can prevent coupling and additional sounds produced by the surface.
- Symmetry is key in a studio setup. The speakers need to be centered in the room, at an equal distance from each side wall, to avoid inherent imbalances in the stereo image.
Music-themed Artwork for Inspiration

Incorporating music-themed artwork into a studio can be inspiring and help foster a creative atmosphere. Vibrant paintings of legendary musicians, abstract depictions of musical notes, or even sculptural pieces made from retired instruments, can serve as visual stimulation and evoke musical thoughts and ideas.
Consider these key points:
- Select artworks that reflect personal musical tastes and inspirations.
- Use a mix of large and small pieces to create a visual rhythm.
- Consider the color palette of the art to ensure it complements the studio’s overall decor.
- Mix and match mediums for added interest: posters, paintings, framed records, sculptures.
- Position the artwork properly for maximum visibility and inspiration during recording sessions.
Remember, the artwork is not just decoration – it should be a source of inspiration, telling a unique musical story that stimulates creativity in listeners and artists alike.
Computer Station With Ergonomic Chair

An optimal computer station is pivotal to streamline the music production process. An ergonomic chair contributes significantly by providing support and comfort during extended periods of work, reducing fatigue and risk of injury.
Here’s what to consider:
- Adjustable Heights: Ensure the chair and desk complement each other in height, allowing for a relaxed position where the monitor is at eye level and the arms are at 90 degrees while typing.
- Quality Materials: Prioritize chairs made of breathable fabric and desks resistant to wear and tear.
- Mobility: Choose chairs with smooth casters for swift and easy movement across the studio.
- Support features: Ample lumbar support and a headrest can greatly enhance comfort and improve posture during long working hours.
Remember, investing in a good setup can help maintain productivity and focus in the studio.
Rack for Guitars and Other String Instruments

A well-organized instrument rack keeps your guitars, violins, ukuleles, or other string implements within an arm’s reach while also maintaining the integrity of each piece. When planning for these racks, certain considerations can make the difference.
1. Orientation – Vertical or horizontal depending on instrument shape and available space.
2. Material – Wood is traditional and adds a homely touch, while metal is more modern and efficient.
3. Positioning – Ensuring accessibility without hampering movement around the studio.
4. Protection – Soft inner lining for scratch prevention.
5. Humidity Control – Crucial for string instruments to prevent warping.
It must not interfere with the walking space, while also being positioned to avoid direct sunlight, as extreme temperatures can damage the instruments. A corner placement is often recommended. Also considering extras like a built-in hygrometer could assist in maintaining ideal humidity for your string instruments.
Adjustable Piano Bench for Comfort

An adjustable piano bench is indispensable for maintaining proper posture during long practice or recording sessions. Here’s why its presence is essential:
- Enables customization of height, ensuring alignment of the player with the keyboard.
- Promotes a straight back, reducing fatigue and discomfort.
- Facilitates an optimal range of motion for hand and arm movements.
- Tailors to individual ergonomic needs, accommodating a variety of body sizes and heights.
- Most models have storage for sheet music, maximizing space efficiency.
Designated Space for Breaks

Break times are crucial, especially during long hours of producing or practicing music.
1. Design a cozy corner with a comfortable couch for relaxation and brainstorming.
2. Include a small refrigerator for refreshments and snacks to keep energy levels high.
3. Install a coffee machine for those late-night sessions.
4. Provide a magazine rack with inspirational reads for quick skimming.
5. Add elements like an indoor plant or wall-art for a homely touch.
6. Incorporate a Bluetooth speaker to play different playlists during breaks.
7. Ensure proper lighting, a mix of warm and cool lights to keep the mood balanced.
8. For a clutter-free space, use multi-utility furniture such as tables with built-in storage.
9. Lastly, think about installing a small television for taking breaks with music videos or movies.
Area for Vinyl and Music Book Collections
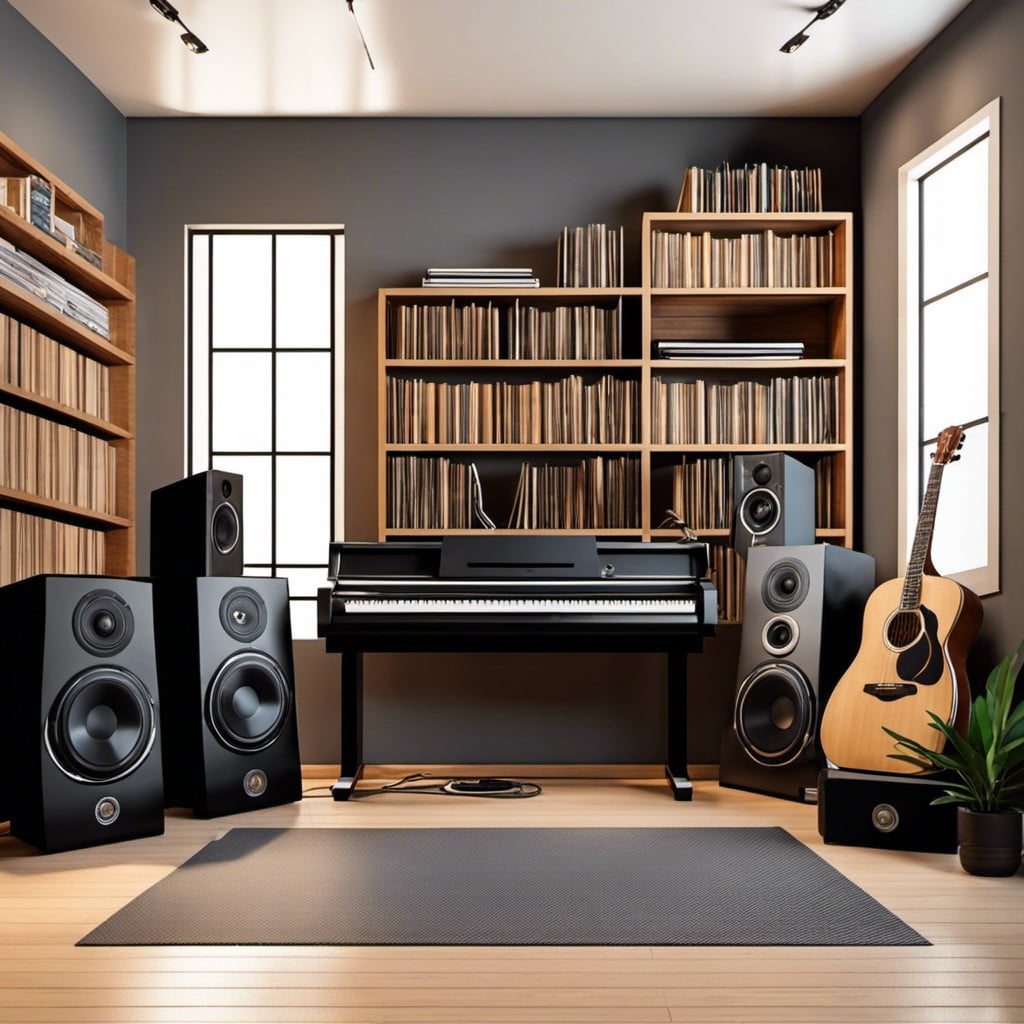
Choosing the right location is crucial; a quiet corner or a dedicated room can serve well. Utilize vertical space to secure your vinyl records on wall-mounted shelves, ensuring they remain easily accessible. For book collections, try vintage-style wooden bookshelves. They not only offer adequate storage but also enhance the aesthetics of your music studio.
Key Points:
- Selecting a location: quiet corner or dedicated room.
- Utilizing wall-mounted shelves for vinyl record storage.
- Choosing vintage-style wooden bookshelves for storing music books.
- Enhancing studio aesthetics with book and vinyl display.
Continue exploring:


